پیکربندی Dell EMC Unity VSA در VMware vSphere

ارسال شده توسط admin | در دسته بندی Uncategorized

Configure Dell EMC Unity VSA on VMware vSphere

This article covers the initial steps on how to configure a Dell EMC Unity VSA running on a VMware vSphere environment. This one follows up the deployment steps of the Unity VSA appliance. The initial steps to configure Dell EMC Unity appliance on VMware are very easy and can be operated either using the command line or with a lot easier Web interface using a browser and interacting with the Unisphere application.

Now there are indeed plenty of benefits coming with the Unisphere interface and namely:

  • Single console to manage different types of storage (Primary, Secondary, Shares)
  • Integration with VMware vCenter APIs (VAAI)
  • Advanced Storage features (eg. Replication)
  • and more..

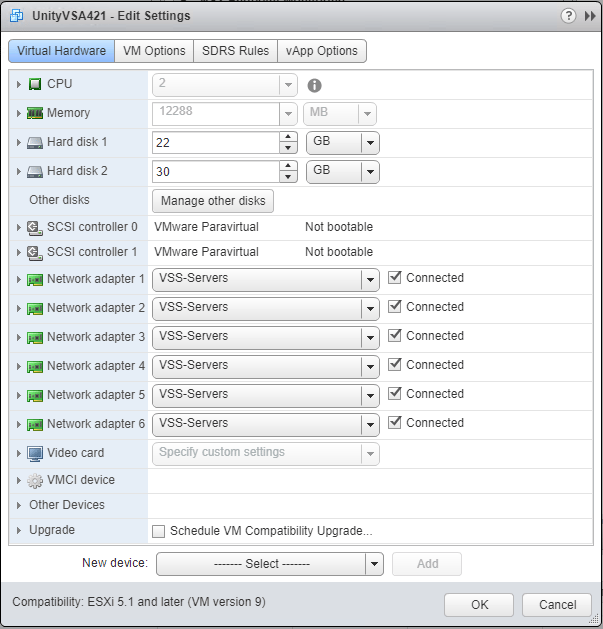
The idea is to explore these features in this article series as soon as the Unity VSA appliance is installed. With regard to the installation process the Unisphere wizard will guide through the setup of essential components. On the first boot just after the Unity VSA deployment on VMware it is possible to use the VMware Remote Console to check the status of the services, if there are any exceptions and of course also the ability to use the command line to start the installation. In terms of requirements it is advised to leave the Unity VSA with 12 GB of RAM Memory. At least for the initial configuration step. Later, should advanced storage feature not be required or used it is possible to let the vSphere Host to claim back some memory resources.

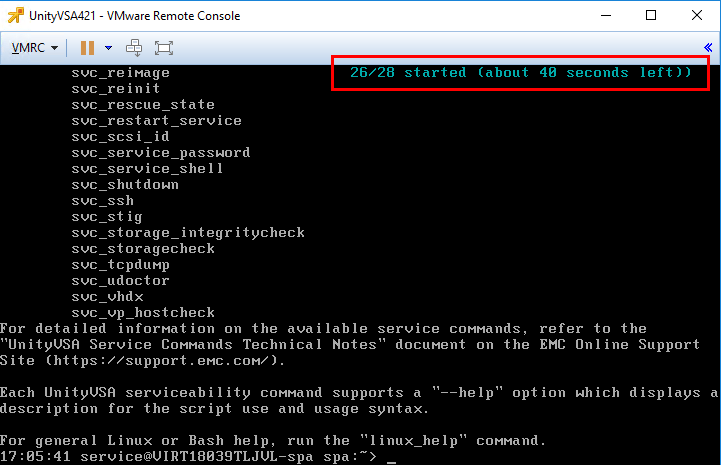
From the same terminal console the Dell EMC Unity VSA boot installer provides a list of remaining services (top right) to start and approximately how long this will take. The reality is the services will take less time to start and be ready.

Next the steps to configure the IP, DNS, NTP, Storage Pools, iSCSI interfaces and more.


How to configure Dell EMC Unity VSA

After starting the Unity VSA appliance from the VMware Remote Console it is possible to check the status of the services upon the first boot. The Unity VSA provides a login to interact using the command line. Before starting to configure Dell EMC Unity VSA it is advised to wait until all services are started.

domalab.com Dell EMC Unity VSA VMware Remote Console

The Dell EMC Unity default username and password are “admin” and “Password123#”. Of course these can be changed after the first login.

domalab.com Dell EMC Unity VSA login

Next step is to start the setup procedure. If all services are not up and running yet the configuration will not start with a message like:

“Error 15: System state is not ready to accept configuration, please try again later”.

domalab.com Dell EMC Unity VSA service not started

Now that majority of services have started it is possible to start configure Dell EMC Unity VSA. The command to start the procedure is:

“svc_initial_config -4” “ManagementIPAddress SubnetMask Gateway”

This command will validate on IPv4 the chosen IP addresses.

domalab.com Dell EMC Unity VSA initial config

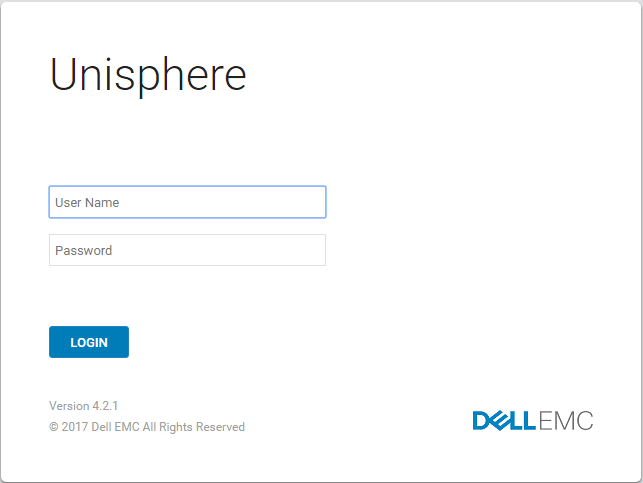
As soon as the IPs are validated the rest of the configuration can be done using the Web interface by using Unisphere on the chosen IP Address and providing the default admin login credentials.

domalab.com Dell EMC Unity VSA unisphere login

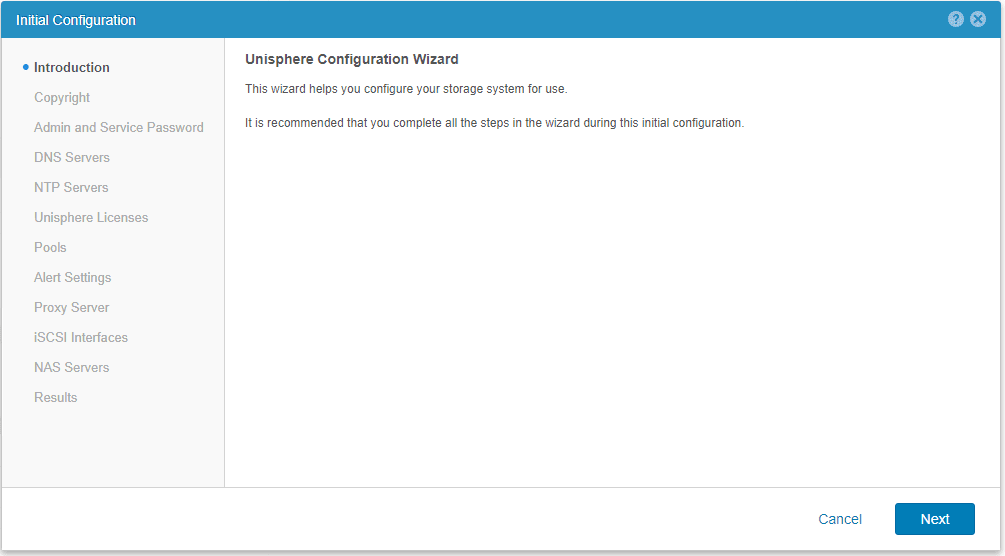
At this point the wizard to configure Dell EMC unity VSA starts.

domalab.com Dell EMC Unity VSA unisphere configuration wizard

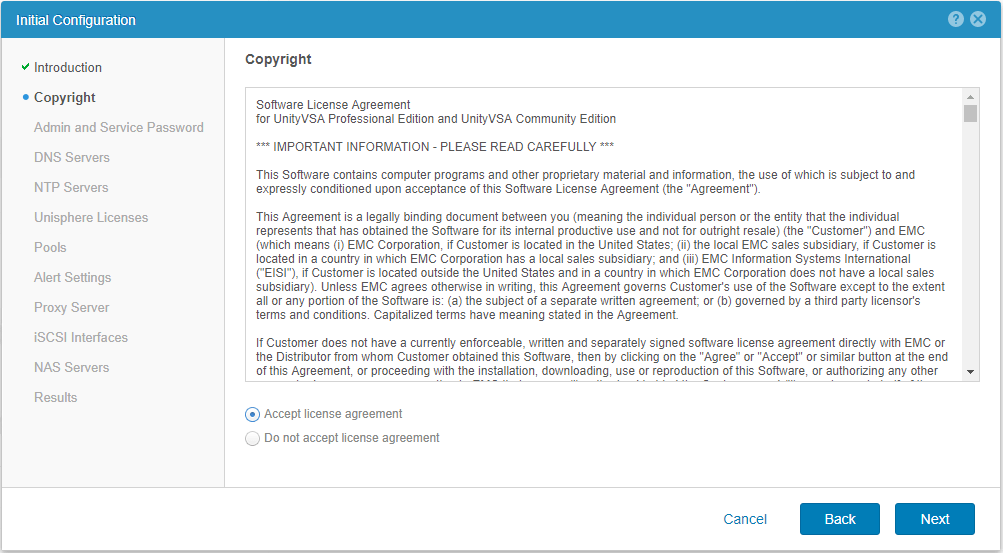
Let’s accept the License Agreement and continue.

domalab.com Dell EMC Unity VSA unisphere license

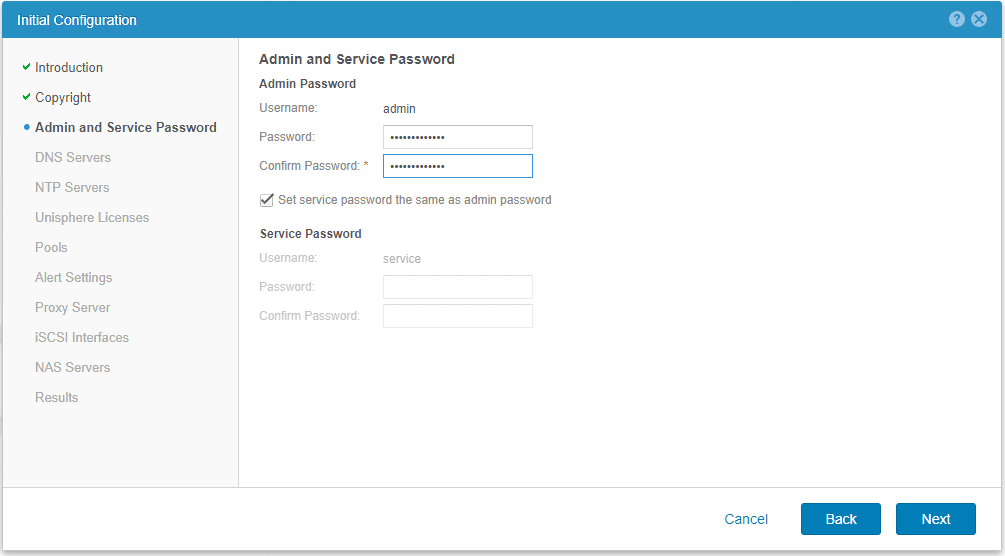
The wizard allows to change the default admin password and also to create a new one for the service account which can have limited access to specific functionalities.

domalab.com Dell EMC Unity VSA unisphere admin password

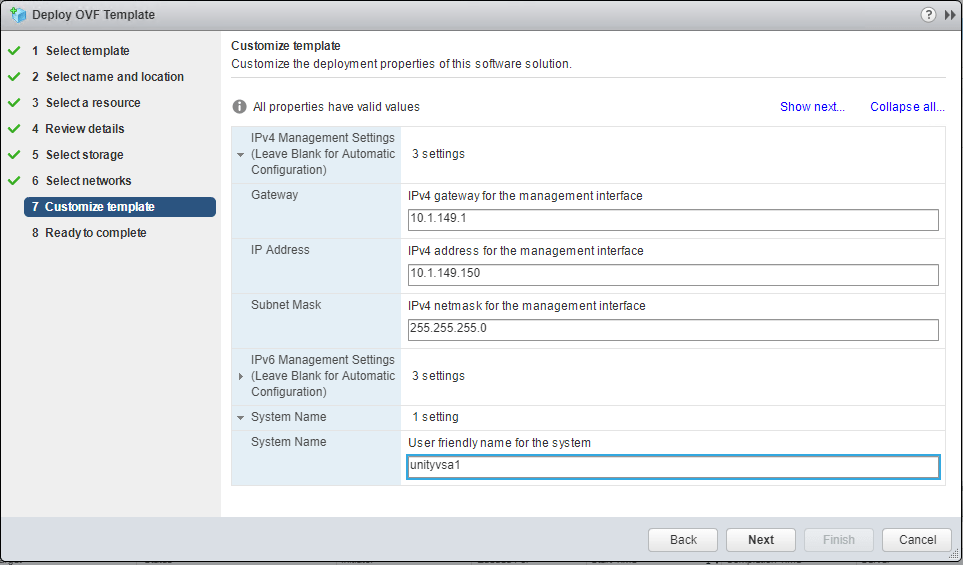
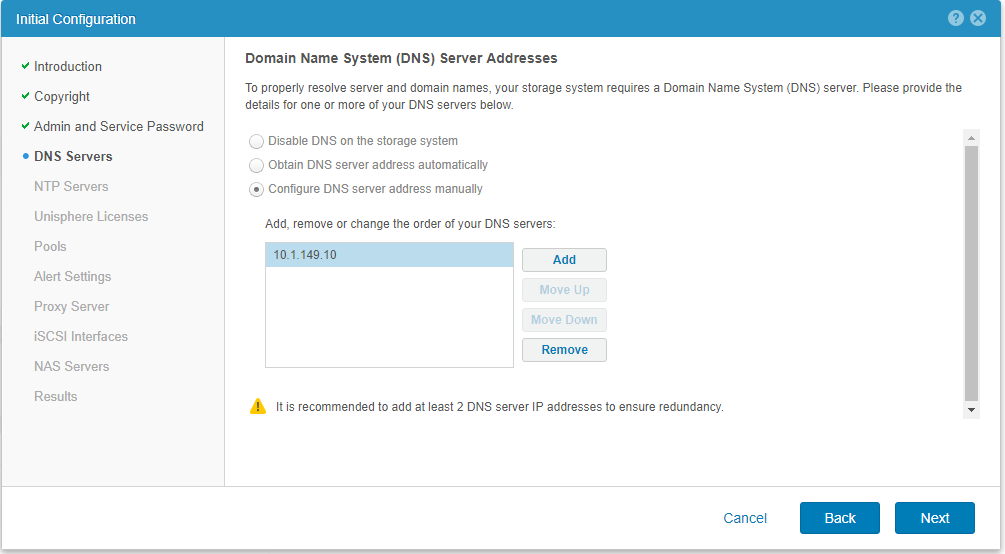
Next step is to provide multiple DNS servers when available. Also, as a best practice to provide a static IP address with the pertinent (A) and (PTR) records for full FQDN name resolution.

domalab.com Dell EMC Unity VSA unisphere DNS

Same applies for the NTP server settings. Ideally 3 different NTP servers provide fault tolerance should one or two not be available or with different timing values.

domalab.com Dell EMC Unity VSA unisphere NTP

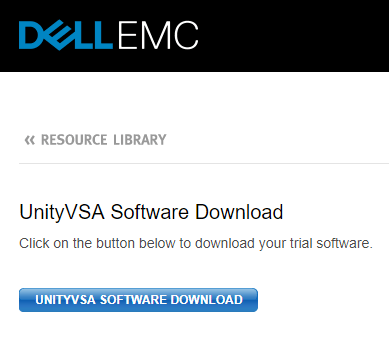
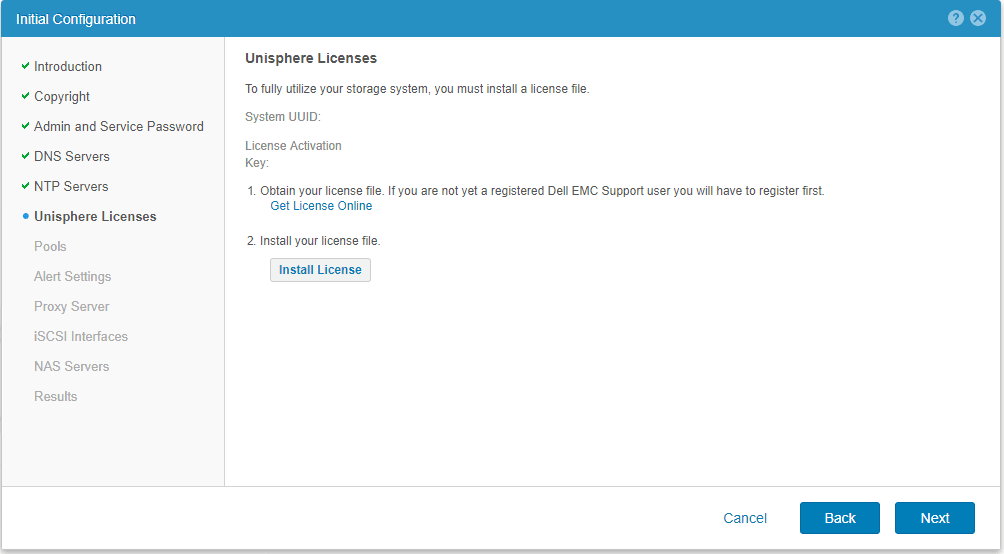
In the Unisphere licenses it is now time to take a copy of the System UUID generated by the installation process. This UUID will be associated to a single license of the Unity VSA Community Edition which allows up to 4TB of Storage for free. Eventually it is possible to extend the storage required to higher capacities with the Professional Editions and using exactly the same installation.

domalab.com Dell EMC Unity VSA unisphere licenses

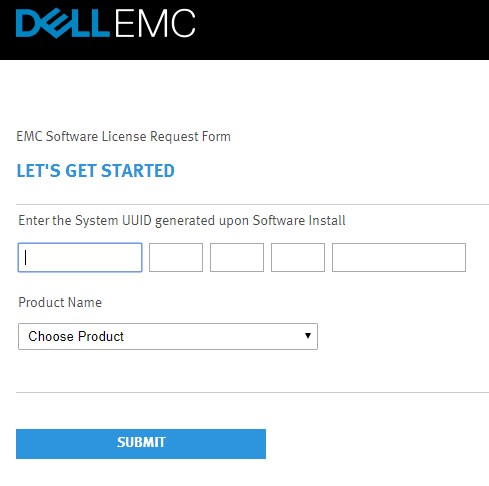
In the link provided from the Unisphere GUI the page to enter the System UUID.

domalab.com Dell EMC Unity VSA UUID

The Dell EMC Unity VSA Community Edition is now licensed.

domalab.com Dell EMC Unity VSA unisphere licensed

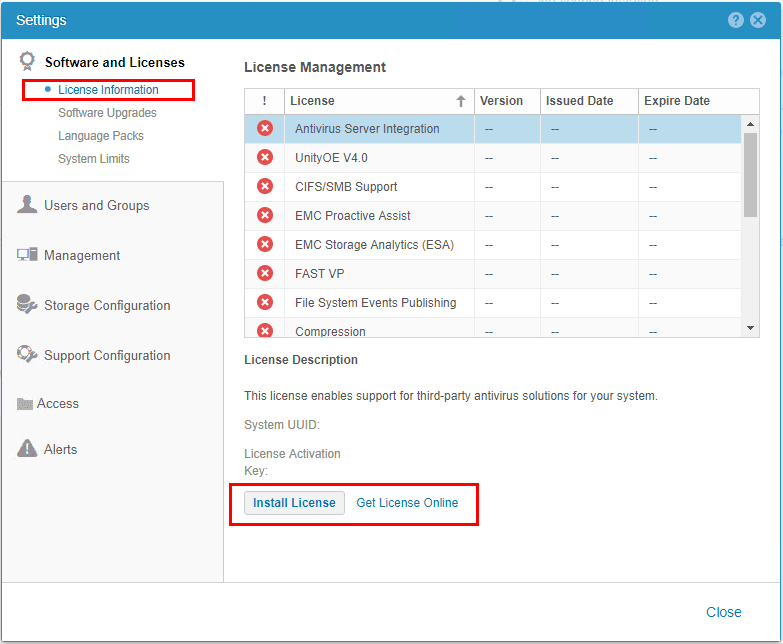
Once the Unity VSA is activated it is possible to review all the features that the Community Edition license brings. Pretty much everything:

  • Antivirus Server Integration
  • UnityOE v4.0
  • CIFS/SMB support
  • EMC Storage Analytics (ESA)
  • FAST VP
  • File System Events Publishing
  • iSCSI
  • Local Copies
  • Network File System (NFS)
  • Quality of Services (QoS)
  • Replication
  • Thin Provisioning
  • Unisphere
  • Unisphere Central
  • VMware VASA/VVols

Very comprehensive for a Community Edition. The only ones not included are:

  • EMC Proactive Assist (Support)
  • Data Reduction
  • IP Multi-Tenancy (Tenant level on NAS Shares)

domalab.com Dell EMC Unity VSA installed license

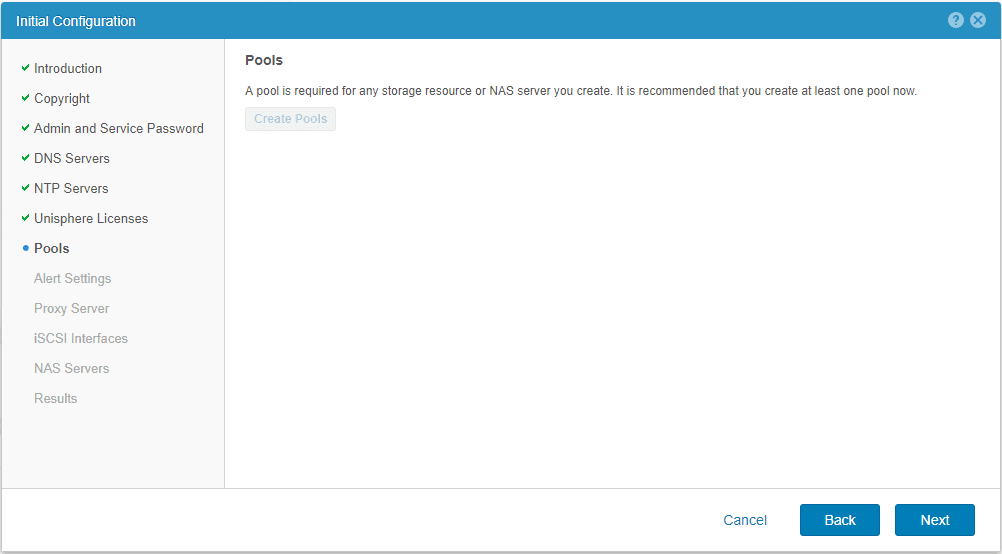
The rest of the steps to configure Dell EMC Unity VSA at this point refer to the storage aspects. everything is wizard driven with the option to revisit and make changes the configurations.

The first one is about creating a storage Pool. Essentially this is a logical group of the physical or attached storage to the appliance. Storage Pools can be presented to various applications. It starts by creating a Pool.

domalab.com Dell EMC Unity VSA create pool

The first Pool that will be created will group the first two virtual disks as per previous article.

domalab.com Dell EMC Unity VSA pool name

The Tiers Assignment shows the available storage presented to the Unity VSA.

domalab.com Dell EMC Unity VSA tiers assignment

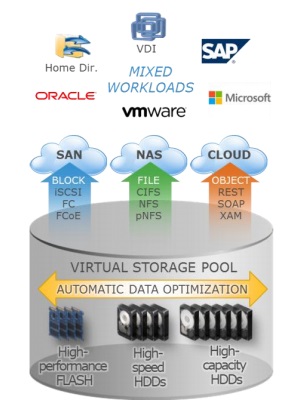
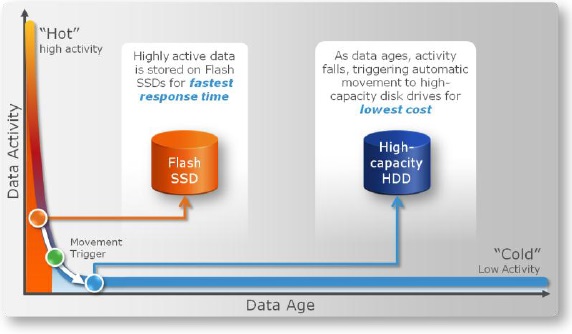
In the Tiers section the wizard provides 3 options as Extreme Performance, Performance and Capacity Tiers. The idea is to associate them based on storage types and workload they will be serving. For example Extreme can be a group of all Flash Storage, whereas Performance can be a combination of SATA with SSD Caching and Capacity as a group of large SATA or HDD drives.

The built-in FAST VP functionality of Unity VSA provides an adaptive allocation of data blocks based on usage and tiers avaialable. In this way higher tiers will be used for data that changes and updated often taking advantage of the low latency and high IOPS.

domalab.com Dell EMC Unity VSA tiers

Next is to define which storage will be assocaited with which tier.

domalab.com Dell EMC Unity VSA virtual drives

Since Dell EMC Unity VSA integrates with vCenter APIs it also offers extended capabilities when working with VMware VVols. A dedicated article will cover these aspects in more details.

domalab.com Dell EMC Unity VSA capability profile name

And finally a summary showing the main information before committing changes.

domalab.com Dell EMC Unity VSA wizard summary

The wizard to create a Storage Pool is now completed successfully. Of course this configuration is available for changes where required. For example by adding more disk capacity.

domalab.com Dell EMC Unity VSA wizard pool

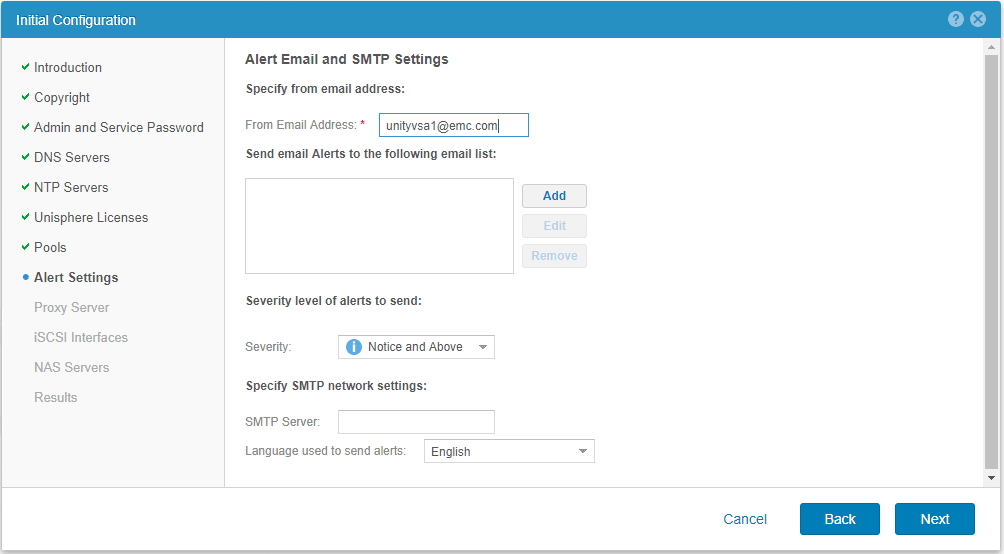
In the Alerts section the options to specify email and SMTP details where to send notifications for various events also based on the severity type.

domalab.com Dell EMC Unity VSA alert settings

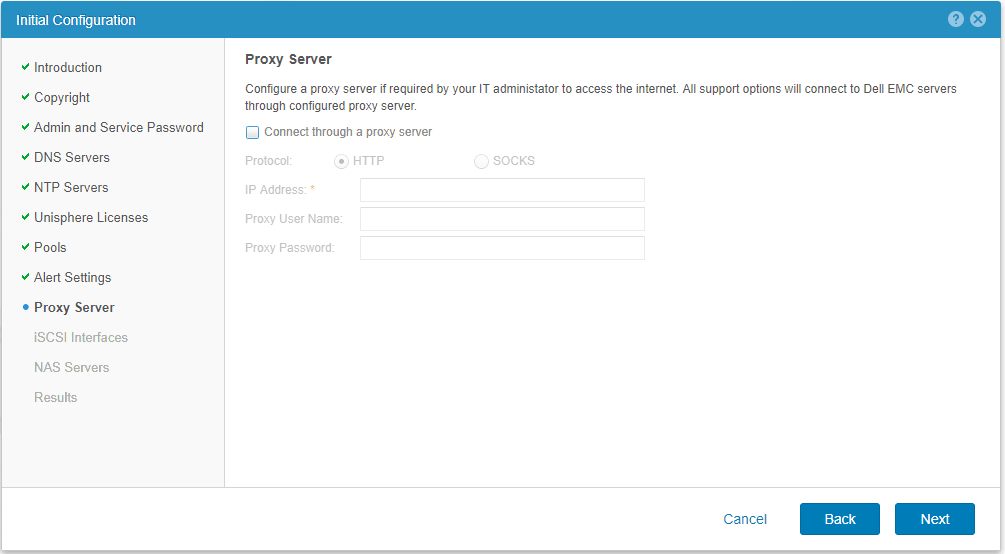
Should a Web Proxy be used it is necessary to configure this one in the Unity VSA as well to allow internet connection for example to verify and download software updates.

domalab.com Dell EMC Unity VSA proxy server

The wizard also allows to setup the iSCSI connections. This allows for example to iSCSI initiators to connect to the Storage provided by the Dell EMC Unity VSA.

domalab.com Dell EMC Unity VSA add iSCSI insterface

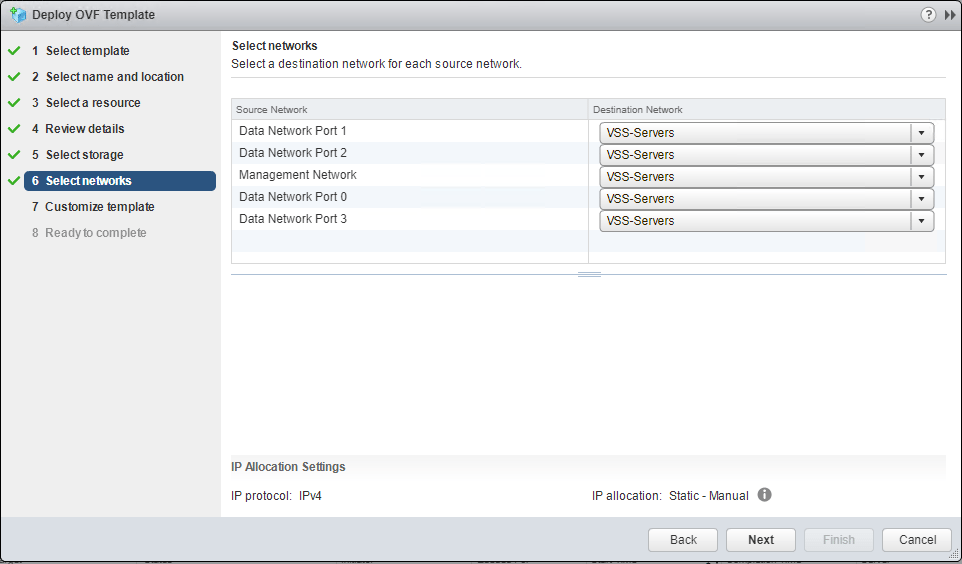
In the Ethernet Port let’s choose the network interface to use with the desired network settings.

domalab.com Dell EMC Unity VSA iSCSI

In this case two iSCSI interfaces have been created to provide redundancy when accessing the Unity Storage. Of course these network interfaces will be connected to separate physical switches.

domalab.com Dell EMC Unity VSA multiple iSCSI

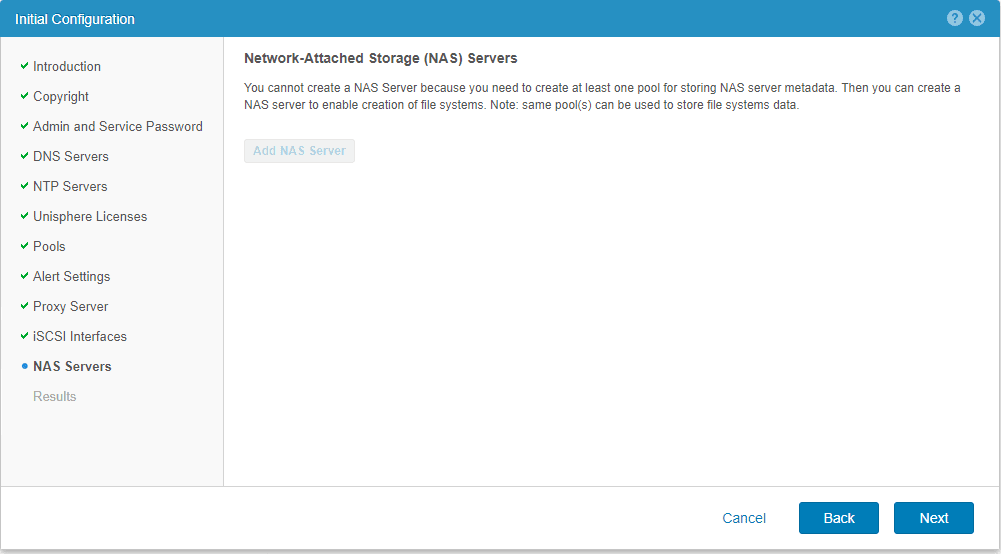
The wizard also allows to create a NAS Server to host SMB and NFS shares. This will be covered in the next article.

domalab.com Dell EMC Unity VSA add NAS Server

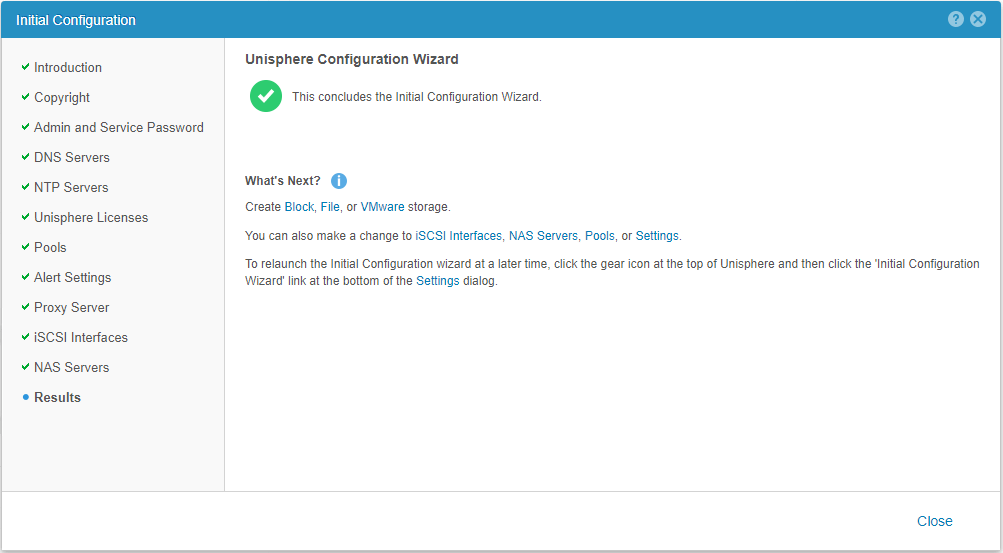
At this point the wizard has all the information to initially configure Dell EMC Unity VSA. Eventually it is always possible to change settings at a later stage.

domalab.com Dell EMC Unity VSA wizard summary

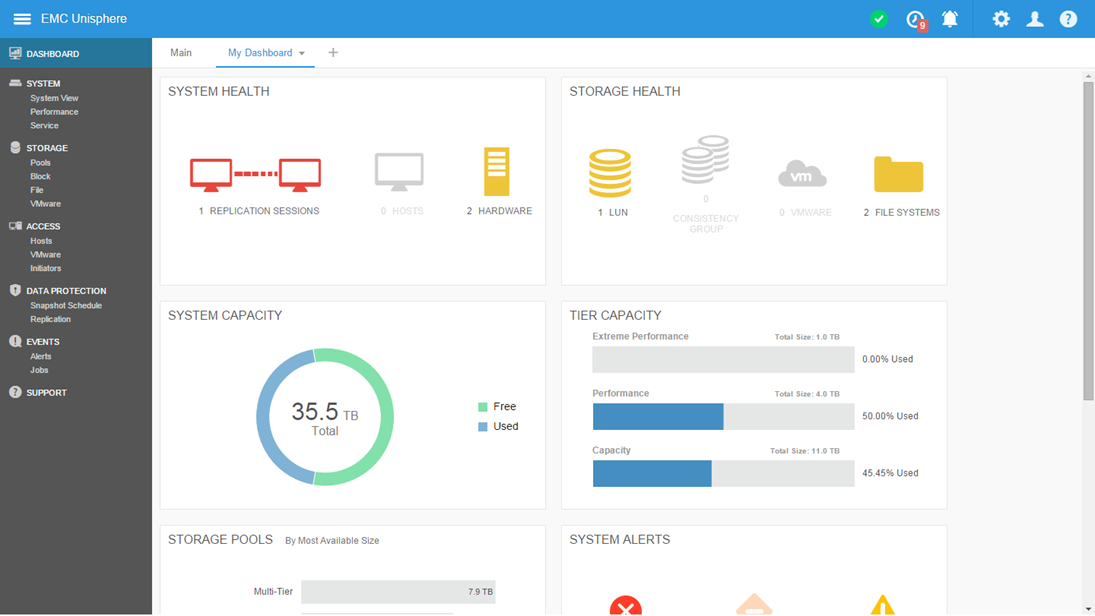
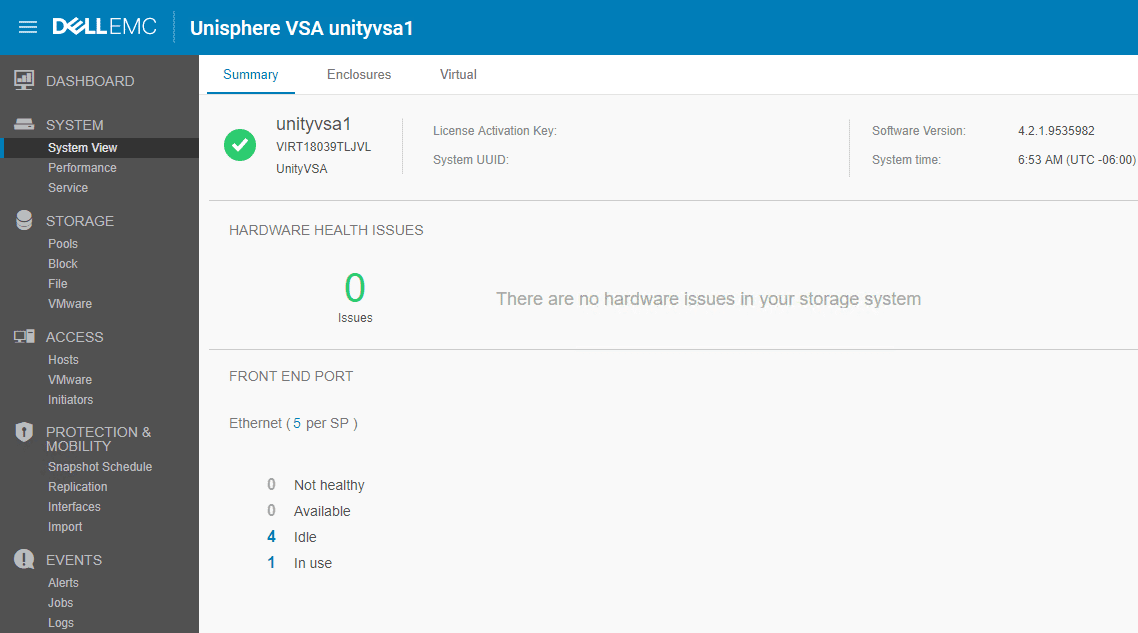
As expected the main dashboard is now starting to populate with different information as soon as the configuration proceeds.

domalab.com Dell EMC Unity VSA dashboard

0 دیدگاه | ژانویه 11, 2019

نصب و پیکربندی Dell EMC UnityVSA

ارسال شده توسط admin | در دسته بندی Uncategorized

Dell EMC UnityVSA storage appliance installation and configuration

One of the great resources for home labenvironments is vendor released virtual storage appliance software solutions that emulate models of hardware that is typically found in the enterprise. Getting your hands on the actual hardware appliances can be difficult and really not very feasible. The Virtual Storage Appliance or VSA can be a great way to learn and interact with various vendor storage technology by simply provisioning a virtual appliance. One of the VSA’s available for home lab use is the EMC UnityVSA that offers a “community” edition that is fully featured with only size limitations on the storage size that can be configured. This emulates the mid range Unity appliance that is offered in either the all-flash or hybrid version. Let’s take a look at Dell EMC UnityVSA storage appliance installation and configuration.

What is Dell EMC UnityVSA?

The Dell EMC UnityVSA contains the enterprise features of the Dell EMC Unity family of hardware and makes for an easy way to play around with the “hardware” in a home lab environment. The community edition of the license is available for up to 4TB of capacity and best of all, this is a freebie to play around with.

Using the UnityVSA you can:

  • Play around with Unisphere
  • Manage sotrage from within vCenter
  • have access to point-in-time snapshots
  • Replicate data between storage arrays
  • Play around with tiering solutions with EMC Fully Automated Tiering Virtual
  • Provide file services to block storage
  • Play around with Vvols

Supported Protocols:

  • SMB (SMB1, SMB2, and SMB3), NFSv3, NFSv4, NFSv4.1,FTP, SFTP, iSCSI
  • Network Lock Manager (NLM) v3, v4
  • Routing Information Protocol (RIP) v1-v2
  • Simple Network Management Protocol (SNMP)
  • Network Data Management Protocol (NDMP) v1-v4
  • Address Resolution Protocol (ARP)
  • Internet Control Message Protocol (ICMP)
  • Simple Network Time Protocol (SNTP)
  • Lightweight Directory Access Protocol (LDAP)

VMware Integration:

  • VVols support for VM-granular data services and Storage Policy Based
    Management (SPBM).
  • VMware vStorage APIs for Storage Integration (VAAI) for File and
    Block, improves performance by leveraging more efficient, array-based
    operations.
  • vStorage APIs for Storage Awareness (VASA) provides storage
    awareness for VMware administrators

Dell EMC UnityVSA storage appliance installation and configuration

The first thing we need to do is download the Dell EMC UnityVSA appliance.  You can download the Dell EMC UnityVSA from Dell EMC here:  https://www.emc.com/products-solutions/trial-software-download/unity-vsa.htm

Download-the-Dell-EMC-UnityVSA-appliance Dell EMC UnityVSA storage appliance installation and configuration

Download the Dell EMC UnityVSA appliance

The appliance is an OVA appliance format.  I won’t go through all the OVA appliance deployment steps here as they are fairly straightforward.  There are a couple of screens however, you need to pay attention to.  The select networks screen of the deployment, you select the network connections for both the Data Network and the Management Network.

Select-Dell-EMC-UnityVSA-appliance-network-configuration Dell EMC UnityVSA storage appliance installation and configuration

Select Dell EMC UnityVSA appliance network configuration

On the Customize template screen, we set the gatewayIP AddressSubnet Mask, and System Name for the appliance.

Assigning-an-IP-address-mask-and-gateway-to-the-Dell-EMC-UnityVSA-appliance Dell EMC UnityVSA storage appliance installation and configuration

Assigning an IP address mask and gateway to the Dell EMC UnityVSA appliance

One thing to note that before booting the appliance, you need to add the disks that you want to use for data – creating your storage pools, datastores, etc.  For tinkering around in the home lab, I simply added (3) 20 GB drives attached to a new ParaVirtual storage controller.

Adding-additional-hard-drives-to-the-EMC-UnityVSA-appliance Dell EMC UnityVSA storage appliance installation and configuration

Adding additional hard drives to the EMC UnityVSA appliance

As the appliance boots, it will display the estimated seconds left before the services are started and you will see the number out of /28 that are started.  This displays on the console of the appliance as it boots.

The-Dell-EMC-UnityVSA-appliance-boots Dell EMC UnityVSA storage appliance installation and configuration

The Dell EMC UnityVSA appliance boots

After the appliance is booted, you can browse out to the IP you assigned during setup to login to the Unisphere web interface.  The interface is really nice being an HTML5 UI.  The default credentials are:

user:  admin
password:  Password123#

Once-the-UnityVSA-appliance-has-booted-you-can-browse-to-the-IP-in-a-web-browser Dell EMC UnityVSA storage appliance installation and configuration

The Dell EMC UnityVSA appliance boots

The first time you login to the appliance the Initial Configuration wizard begins that allows setting up the initial configuration of the appliance including, DNS, NTP, licensing, storage pools, SMTP settings, web connectivity, storage interfaces, NAS, etc.

UnityVSA-initial-configuration-begins Dell EMC UnityVSA storage appliance installation and configuration

UnityVSA initial configuration begins

Normal stuff, accepting EULA.

Accept-the-EMC-UnityVSA-license-agreement-during-initial-setup Dell EMC UnityVSA storage appliance installation and configuration

Accept the EMC UnityVSA license agreement during initial setup

During the initial configuration, you can change the default admin password.  You can also set the service password to the same as the admin password or set them differently.

Change-the-admin-password-for-the-EMC-UnityVSA-appliance Dell EMC UnityVSA storage appliance installation and configuration

Change the admin password for the EMC UnityVSA appliance

Adding DNS servers.

Adding-DNS-server-configuration-for-the-EMC-UnityVSA-appliance Dell EMC UnityVSA storage appliance installation and configuration

Adding DNS server configuration for the EMC UnityVSA appliance

Setting up the NTP server for consistent time keeping.

NTP-configuration-for-EMC-UnityVSA-appliance Dell EMC UnityVSA storage appliance installation and configuration

NTP configuration for EMC UnityVSA appliance

You can choose to licence your appliance during the initial configuration or this can also be done afterwards.  However, if done afterwards, you will not be able to setup pools and other features during the initial configuration.

Licensing-EMC-UnityVSA-Unisphere Dell EMC UnityVSA storage appliance installation and configuration

Licensing EMC UnityVSA Unisphere

To obtain the license file, you can click on the Get License Online which will take you to the link, or you can navigate to the official license guide that has the download link here:  https://community.emc.com/docs/DOC-53007

One thing to mention, apparently, at least in my obtaining both the appliance and the license, they both require signing up for an account.  My account that I created to download the appliance did not work when trying to obtain the license file.  There was a link however to create an account there which allowed me to finally get to the license download page.

Enter-the-system-UUID-from-the-appliance-to-obtain-the-license-file Dell EMC UnityVSA storage appliance installation and configuration

Enter the system UUID from the appliance to obtain the license file

To configure the licensing afterwards, navigate to the Support link at the bottom left navigation menu in the Unisphere interface.

Installing-the-license-file-after-initial-configuration Dell EMC UnityVSA storage appliance installation and configuration

Installing the license file after initial configuration

I simply nexted past the Pools configuration as when running through the initial configuraiton, I didn’t already have my license file as I was able to get that later.  You can however, using the normal Unisphere interface, create the Pools and other settings if these are not defined in the initial configuration wizard.

Create-Pools-requires-a-license-for-EMC-UnityVSA Dell EMC UnityVSA storage appliance installation and configuration

Create Pools requires a license for EMC UnityVSA

Normal, SMTP/alerting configuration.

Setting-up-EMC-UnityVSA-SMTP-and-alert-settings Dell EMC UnityVSA storage appliance installation and configuration

Setting up EMC UnityVSA SMTP and alert settings

Define any proxy server settings needed to make egress connections the Internet.

Configure-any-Proxy-settings-for-the-EMC-UnityVSA-appliance Dell EMC UnityVSA storage appliance installation and configuration

Configure any Proxy settings for the EMC UnityVSA appliance

You can also setup the iSCSI Network Interfaces during the intial setup that allows creating your iSCSI interfaces used by your hosts to connect to storage.

Create-iSCSI-interfaces Dell EMC UnityVSA storage appliance installation and configuration

Create iSCSI interfaces

NAS server creation.

Configure-NAS-Server-settings Dell EMC UnityVSA storage appliance installation and configuration

Configure NAS Server settings

After running through the wizard, you will see the Results page showing that initial configuration has completed and potential next steps.

Finishing-the-Dell-EMC-UnityVSA-initial-configuration Dell EMC UnityVSA storage appliance installation and configuration

Finishing the Dell EMC UnityVSA initial configuration

The-Dell-EMC-Unisphere-interface Dell EMC UnityVSA storage appliance installation and configuration

The Dell EMC Unisphere interface

Thoughts

It is a great thing when vendors provide the virtual storage appliances that allow easily having access to the same technology without the physical hardware.  The Dell EMC UnityVSA is a great way to get your hands on the Unity class appliance in a home lab.  The same Unisphere interface is utilize and most of the available features and functionality as the physical hardware version. As you can see in the DellEMC UnityVSA storage appliance installation and configuration walk through, getting up and running with the appliance only takes a few minutes and allows you to play around with the interesting technologies such as VVOLs. Stay tuned for a more in depth look at creating VVOLs with the EMC UnityVSA appliance.

0 دیدگاه | ژانویه 11, 2019

معماری DELL EMC Unity – بخش دوم

ارسال شده توسط admin | در دسته بندی Uncategorized

Unity Architecture – Part II

Is Unity really a re-branded VNX2/VNX? Well, let’s find out. In this post, we will take a closer look at the functions of Unity OE. This post is part II of Unity Architecture series. If you have not read the part I click here (opens in new window) to read.

Unity OE

The Operating System that runs on Unity hardware is called Unity OE (Operating Environment). Unity OE is based on SUSE Linux Enterprise Server (SLES). Unity provides block and file access to hosts and clients. Unity is an Asymmetric Active-Active array and is ALUA aware.

Multicore Cache

Each SP has a certain amount of Cache. In the older storage systems, usually the cache is divided into Read Cache and Write Cache and most of the times it will be a static partition and does not dynamically change according to the IO served. Unity’s Multicore Cache is dynamic and the amount of Read and Write cache is dynamically adjusted according to the read and write operation. The main aim of this approach is to minimize forced flushing when the high watermark level on the cache is reached. An additonal layer of SSD Cache can be added to a hybrid pool by leveraging FAST Cache technology.

Unity Block and File Storage

Using FC and iSCSI protocol, Unity provides block access of storage to hosts. Without any special hardware, Unity also provides file access to hosts via NAS Servers (virtual) that can be created in Unity OE. The most fundamental part of Unity storage is the Unified storage pools. Unity allows all types of storage resources such as Block LUNs, VVols, and NAS file systems to be placed in the same storage pool. The following diagram shows various storage resources residing in the same storage pool.

Unity storage pools

Storage Pools

The disks that are residing in DPE and DAE can be grouped together to form storage pools. In a pool, there can be three tiers,

  • Extreme performance tier (SSD)
  • Performance tier (SAS)
  • Capacity tier (NL-SAS)

RAID protection is applied on the tier and not at the pool. In Unity, All Flash system the pool will contain only extreme performance tier and they are called All Flash Pools. In hybrid systems, it is possible to create an all flash pool with only SSD’s and later on expand the pool with SAS or NL-SAS disks. Each tier in the pool can have different RAID levels applied. For Example, extreme performance tier can have RAID 10 and performance tier can be configured with RAID 5 and the capacity tier can be configured in RAID 6 fashion. But the same tier cannot have different RAID types. A drive that is part of one storage pool cannot be part of another storage pool.

FAST VP

FAST stands for Fully Automated Storage Tiering. Configuring pools is the first step in provisioning storage in Unity. Unity uses FAST VP (Fully Automated Storage Tiering for Virtual Pools) algorithms to move hot data to SSD and cold data to NL-SAS. The policy can be adjusted according to business need via Unisphere. Following are the available Tiering Policies,

  • Highest Available Tier
  • Auto-Tier
  • Start High then Auto-Tier (Default/Recommended)
  • Lowest Available Tier

When FAST VP is enabled, the data is spread across the pool in 256 MB slices. FAST VP is enabled on a storage resource such as LUN, Datastore individually.

HIGHEST AVAILABLE TIER

With Highest Available Tier policy of FAST VP, new data slices are provisioned from the extreme performance tier. If that gets full, new slices are then provisioned from the next tier. With this policy, we should expect superior performance and low latency as all data is kept in extreme performance tier, only when it gets full the next tier is chosen. During the next relocation schedule, the system tries to place the slice in the highest tier only. Hot slices will take precedence over any other tiering policy. Hot denotes frequently accessed slices and cold denotes less frequently accessed slices.

AUTO-TIER

Auto-Tier policy is very similar to highest available tier policy with two primary differences,

  • Even if a slice with auto-tier is more active than a slice with highest available tier policy, during relocation the slice belongs to highest available tier policy takes precedence.
  • When new storage resource with auto-tier policy is created, slices are allocated from all tiers depending on the usage of each tier. If more capacity is found in capacity tier, then the slices are allocated from capacity tier initially.

START HIGH THEN AUTO-TIER

Dell EMC recommends using this policy on storage resources and it is the default policy. When new slices are allocated, this policy allocated slices from the highest performance tier. Later on during relocation schedule, slices are moved down if they are not frequently accessed. We can expect good initial performance on the storage resource with this policy and later on, for effective capacity utilization it moved the cold slices down. It works exactly like Auto-Tier policy and the only difference is the initial allocation of slices are from highest performance tier.

LOWEST AVAILABLE TIER

All slices of a storage resource reside always in the lowest tier i.e. the capacity tier. If the lowest tier is full, all slices with this policy will be compared and the one’s with the lowest activity will reside in the lowest tier.

Following table is an excerpt from “EMC Unity: FAST Technology Overview” white paper that summarizes the functions of each tiering policy.

Tiering Policy Corresponding Initial Tier Placement Description
Highest Available Tier Highest Available Tier Initial data placement and subsequent data relocations set to the highest performing tier of drives with available space
Auto-Tier Optimized for Pool Performance Initial data placement optimizes Pool capacity, then relocates slices to different tiers based on the activity levels of the slices
Start High then Auto-Tier (Default) Highest Available Tier Initial data placed on slices from the highest tier with available space, then relocates data based on performance statistics and slice activity
Lowest Available Tier Lowest Available Tier Initial data placement and subsequent relocations preferred on the lowest tier with available space.

The following picture shows hot and cold slices before and after relocation.

Image source: emc.com

Expanding Storage Pool with additional drives

While expanding the pool with additional drives it is not mandatory to use the same stripe width. For example, if the existing tier is configured with RAID 5 4+1 (this means the existing tier contains sets of 5 drives); we can expand the pool in sets of RAID 5 (4+1) or RAID 5 (8+1) or RAID 5 (12+1). In VNX2, it was a best practice to maintain the preferred drive count while expanding i.e. 5 (as per our example). This is no longer the case in Unity, Unity allows expanding a tier in pool with any supported stripe width.

System Drives

Unity OE occupies first 4 disks in DPE. These drives are called as system drives. Unity OE does not occupy the entire drive capacity instead it uses 107GB. The system drives are allowed to take part in the storage pool with nonsystem drives.

FAST Cache

FAST Cache technology extends the existing cache in storage processor by utilizing high-speed SSD’s. FAST Cache is applicable only for hybrid pools. Frequently accessed data (64 KB chunks) in SAS and NL-SAS drives are copied to Cache tier. The data is only copied and not moved; it still exists in drives. Not only the frequently accessed data is copied, the algorithm also copies data that may be read next. After copying FAST Cache memory map is updated.

How read operation is performed in Unity?

For the incoming IO, first, the system cache (DRAM) is checked. If the data found to be residing in the system cache, the requested data is sent to host completing IO request. If a Cache miss occurs, i.e the data is not present in the system cache, FAST Cache memory map is checked. Obviously, FAST Cache must be enabled and configured for the memory map to exist. If FAST Cache exists, its memory map is checked and the data is sent to host. This improves system throughput and reduces response time. In case of system and FAST cache read miss, the data is read from the drive, copied to system cache and then sent to host.

How write operation is performed in Unity?

For all write request, the data is first written in system cache and acknowledgment is sent to host. During flushing, the data is written to pool. For some reason, if the system write cache is disabled, the data is written to FAST Cache (if present) and then written to pool.

Inline Compression

Unity has compression feature available for block LUNs and VMware VMFS Datastores. This feature was added in Unity OE 4.1 release. Compression can be enabled on storage resource while creating it or at a later point. Compression can be enabled for resources that are in all flash pools only. When a host sends data it is placed in system cache first and acknowledgment is sent to host. Compression of data happens inline between system cache and all flash pool. Compression is not available for VVols and file storage resources.

Management tools of Unity

Unity can be managed via Unisphere (HTML 5 GUI), Unisphere CLI and REST API (Unity management functions only and no data access like S3).

Replication, Snapshots and other protection

Unity supports Sync and Async replication of storage resources such as block LUNs, VMware Datastores. File storage resources can be protected by Async replication. Unity also supports snapshots natively. Snapshot supports block LUNs, VMFS Datastores, File systems and VMware NFS Datastores. Data At Rest Encryption can be enabled on Unity. When enabled all data in Unity will be encrypted. Unity also integrates well with other Dell EMC products such as RecoverPoint for DVR like recovery.

This brings us to the end of the post. What we discussed is high-level overview of Unity OE and its functions. I hope you found it helpful. Deep dive posts of Unity features will soon be published.

0 دیدگاه | سپتامبر 26, 2018

معماری DELL EMC Unity – بخش اول

ارسال شده توسط admin | در دسته بندی Uncategorized

Unity Architecture – Part I

Last year, Dell EMC announced Unity midrange storage array at EMC World. Unity is based on VNXe architecture and does not replace the higher model of VNX2, i.e. VNX8000. This post takes a closer look at Unity to understand its hardware components, design, and the software. It is a two-part series. Part I is all about Unity hardware and part II  talks about software architecture of unity.

There are three variants in Unity, Unity Hybrid, Unity All Flash and Unity VSA. The models are Unity 300/300F, 400/400F, 500/500F, 600/600F. Model with “F” at the end is all flash (only SSD’s) and the other one is a hybrid storage system (Flash + Spinning disks). Unity VSA is a virtual appliance that can be deployed on vSphere.  Now let us take a look at some of the important specifications of these models,

Specifications

The specifications listed here is for a system that runs on Unity OE 4.1 aka Falcon.

Unity 300/300F Unity 400/400F Unity 500/500F Unity 600/600F
Processor 2 x Intel 6-core, 1.6GHz 2 x Intel 8-core, 2.4GHz 2 x Intel 10-core, 2.6GHz 2 x Intel 12-core, 2.5GHz
Memory (Both SP) 48 GB 96 GB 128 GB 256 GB
Minimum/Maximum drives 5/150 5/250 5/500 5/1000
Maximum raw capacity* 2.34 PBs 3.91 PBs 7.81 PBs 9.77 PBs
Max IO modules 4 4 4 4
Max number of pools 20 30 40 100
Max LUN Size 256 TB 256 TB 256 TB 256 TB
Max File System Size 64 TB 64 TB 64 TB 64 TB
Max LUNs per array 1,000 1,500 2,000 6,000

*Maximum raw capacity may vary.

Supported disks

Unity Hybrid

SSD’s
200GB, 400GB, 800GB, 1.6TB, 3.2TB
Spinning disk drives
600GB (10K/15K), 1.2TB 10K, 1.8TB 10K, 2TB 7.2K, 4TB 7.2K, 6TB 7.2K

Unity All Flash

SSD’s
400GB, 800GB, 1.6TB, 3.2TB, 3.84TB7.68TB15.36TB
Solid state drives used in Unity are of eMLC and TLC type and the disks highlighted in bold are 1 WPD (write per day) disks.

Disk Processor Enclosure (DPE)

DPE holds storage processor (SP), IO modules and disks. Two variants of DPE is available,

  • 25 Drive DPE that can hold 2.5″ disks (Available for hybrid and all flash array)
  • 15 Drive DPE that can hold 3.5″ disks (Only available for hybrid array)

As seen in the table, SP in the respective model will have a different CPU model and a variable amount of memory. Both types of DPE will occupy 2U when mounted on a rack. The first four drives in Unity is DPE is called system drives. These drives contain Unity OE (Operating Environment). Remaining space in these drives can be used for storage pools. A minimum number of disks that are required to initialize system is 5. On the rear side of the DPE we have, 2x Storage Processor (1&2 on image) , 4x onboard converged network ports (Optical/Twinax) (3), 4x onboard 10 GbE Base-T RJ45 ports (4), 2x power supplies (5), IO module slots (6), 4x SAS port for backend connection (7), a management port and a service port (8). Here is the picture of DPE,

The onboard Converged Network Adapter (CNA) can be configured for 16/8/4/2 Gbps Fiber Channel SFP’s (multimode and single mode) or 10 GbE optical using SFP+ and Twinax. The other 2 on-board port on an SP is 10 GbE Base-T. All these onboard ports can be configured for Block (FC/iSCSI) or File IO (NFS/CIFS). And in each SP there is a management port (to access Unisphere) and a service port (service use or engineering use).

Each SP can have two IO modules installed to expand front end host connection. IO module installed on SPA should match what is installed on SPB respective slot. There cannot be a miss match. Following are the IO modules that Unity supports,

  • 4 port 16GB Fiber Channel
  • 10GbE Base-T
  • 1GbE Base-T
  • 2 port 10GbE Optical (SFP+ and Twinax)
  • 4 port 10GbE Optical (SFP+ and Twinax)
  • 12Gb SAS for backend expansion (Only for Unity 500 and 600)
Unity supports Active Twinax cables only and no support for Passive Twinax.

Protections space for cache (No Vault)

In the case of storage processor failure, the cache contents are dumped into M.2 SSD that resides inside each SP. If cabinet loses power, Unity SP contains an inbuilt battery backup unit (BBU) that can power the SP long enough to dump cache contents into M.2 SSD. Cache content is restored to respective SP cache when power is restored or SP is replaced. The M.2 SSD also contains Unity OE boot image.

Disk Array Enclosure (DPE)

The DAE holds drives and the number of DAE that a model supports will vary. Please refer to the specification table in the post to know the maximum DAE that a system will support. There are two variants of DAE,

  • 25 Drive DAE that can hold 2.5″ disks (2U)
  • 15 Drive DAE that can hold 3.5″ disks (3U)

On the rear side, each DAE has 4 SAS ports (marked as A & B) for DPE to DAE and DAE to DAE connection. The ports need mini-SAS HD connectors. Here are the images of 15 & 25 drive DAE,

That’s all about Unity hardware. In the next post, we will take a closer look at software in Unity. Stay tuned! Click here to read part II.

0 دیدگاه | سپتامبر 26, 2018

معرفی استوریج های EMC Unity

ارسال شده توسط admin | در دسته بندی Uncategorized

معرفی استوریج های EMC Unity

An Introduction to Unity, EMC’s New Storage Array

Unity1

EMC is rolling out a new SAN array lineup called the EMC Unity. At a high level the Unity comes into two main flavors, all flash and hybrid, and support fibre channel, iSCSI, NFS, and CIFS/SMB. It’s a mid-tier array, destined to supplant higher level VNXe arrays, and lower level VNX2 arrays. Specifically, the VNXe 3200 and VNX 5200, 5400, 5600, & 5800. As for right now I’m not aware of any plans to depreciate those arrays so if you’ve just picked one up or aren’t ready to jump into some cutting edge EMC tech then no need to worry.

If you do get the an EMC Unity you’ll get a brand new HMTL5 GUI (no more Java, rejoice!) array with hardware is reportedly 2.5x as powerful in half the physical footprint.

In addition to the physical hardware platforms, there’s also a virtual Unity (UnityVSA) without various size and scale options.

Note that this information comes from Pre-EMC World 2016 sources and may have received updates at EMC World. Also, it’s EMC, so various options and features may not yet be GA.


General Features

  • All Unity arrays support SAN and NAS protocols
    • Fibre Channel
    • iSCSI
    • NFS v3 & v4
    • Secure NFS
    • CIFS/SMB
    • FTP/SFTP
    • Also supports VMware Virtual Volumes (VVOL)
  • A single storage pool can service LUNs, file systems, and VVols
    • FAST VP to rebalance across drive tiers
    • I don’t believe the storage pools can be shrunk
  • NAS services via configurable “NAS Servers”
    • Multi-tenancy, each NAS Server exists as a separate file server with it’s own configuration
  • File system able to auto-shrink & extend for thin file systems
    • Dynamically allocates free space for the file system to maintain a 70-75% used-to-allocated ratio
  • Supports various SMB protocol options & features
    • Continuous availability
    • Protocol encryption
    • Access Based Enumeration
    • Distributed File System
    • Branch Cache
    • Offline Availability
    • Umask
    • Dynamic access control
    • Hyper-V shared VHDX
    • Antivirus


Two Physical Lines, All Flash & Hybrid

  • Unified redundant hardware
    • Unified equipment for SAN & NAS, no need for extra equipment (eg. Data Movers & Control Stations)
      • Storage pools can service both SAN and NAS data
    • 2x Service Processors
      • Internal SSD on each for write cache
      • 1st four drives in array for OS & vault
  • Updated Hardware
    • Dual storage processors
      • Intel E5-2600 processors, 6-12 cores each
      • Active-active data processing
      • BBUs built into DPE (may also be referred to as a Storage Processor Enclosure)
        • BBUs are field replaceable but require the SP to be down (physically removed) for replacement
    • Connectivity options:
      • 2x 1Gb Ethernet for mgmt and service
      • 2x 10Gb Ethernet Base-T (RJ45) for font-end connectivity
      • 2x CNA ports for front-end connectivity, configured during install for FC or Ethernet
      • Additional IO module support (1 per SP):
        • 4 port 12Gb SAS
        • 4 port 4/8/16 Gb Fibre Channel
        • 4 port 1Gb Ethernet
        • 4 port 10Gb Ethernet Base-T
        • 2 port 10Gb Ethernet
        • 4 port 10Gb Ethernet
    • Cannot use VNX drives or DAEs
    • 12Gb SAS backend (vs. 6Gb on VNX)
  • Scaling model versions
    • 300/400/500/600 in hybrid or all flash configurations
      • All flash configuration does not support FAST Cache
    • Unity 300:
      • Hybrid: 150 drives, 900 TB raw (or 1.5 PB raw per second doc I have)
        • 800 GB max FAST Cache
      • Flash Only (Unity 300F): 150 drives, 480TB raw
      • 48GB memory
    • Unity 400:
      • Hybrid: 250 drives, 1.2 PB raw (or 2.5 PB raw per second doc I have)
        • 1.2 TB max FAST Cache
      • Flash Only (Unity 400F):250 drives, 800 PB raw
      • 96GB memory
    • Unity 500:
      • Hybrid: 350 drives, 2.1 PB raw (or 3.5 PB raw per second doc I have)
        • 500 drive capacity planned within a year
        • 3.2 TB max FAST Cache
      • Flash Only (Unity 500F):350 drives, 1.12 PB raw
      • 128 GB memory
    • Unity 600:
      • Hybrid: 500 drives, 3.0 PB raw (or 5.0 PB raw per, get this, a second doc I have)
        • 1000 drive capacity planned within a year
        • 6 TB max FAST Cache
      • Flash Only (Unity 600F):500 drives, 1.6 PB raw
      • 256 GB memory
  • 4k drive block size on physical drives, 520 byte block size on Flash drives
    • 4k block size is specially 4160 bytes, 4096 bytes for the block + 64 bytes for error checking
  • Carries over VNX2 drive mobility


UnityFlash
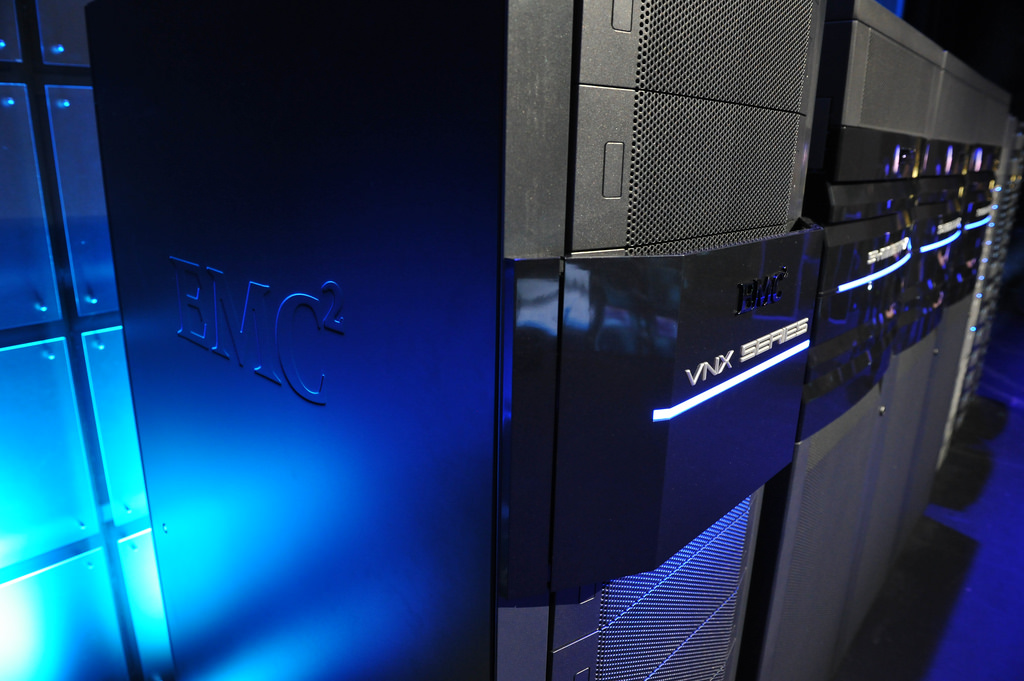
The all flash Unity features a solid, silver double helix.


UnityHybrid

While the helix on the hybrid Unity is blue and silver.


Unity as a Virtual Storage Appliance (UnityVSA)

  • There are two versions available, free (Community Edition) and licensed (Professional Edition)
    • Community Edition is 4TB
      • 12 GB memory
      • Can be upgraded to Professional Edition
    • Professional Edition is licensed by capacity on a yearly basis
      • 10TB, 25TB, and 50TB
      • 16 or 18 GB memory for ESXi 5.5 or 6.0 respecfully
      • Smaller versions can be upgraded to larger ones
  • Serves through iSCSI, NFS, or CIFS via 1 or 10 GbE
  • As far as I’m aware, both versions offer the same functionality
  • Supports asynchronous replication to a VNXe3200/1600, vVNX, or another unity system
  • Data at Rest Encryption supported


Unity’s Software & Configuration Features

UnityGUI

  • HTML 5 GUI
    • Get the fuck out of here, Java
  • Built in performance data collection
    • IOPS, Bandwidth, IO sizes available for file data
    • No known (to this author at least) ability to export performance data
  • Available QoS feature
    • System wide pause/resume control (not sure why this would be needed)
    • Ability to create host IP based policies
    • Only applicable to LUNs, attached snapshots, and VMFS datastores
  • File systems scale to 64TB and support system shrinking, VMDK cloning, and pointer-based snapshots
  • Pool creation
    • Drives are added automatically to a pool per user’s requirements, users cannot add specific drives to a pool
      • Apparently drive mobility will let you manually rearchitecture drive locations after the fact
  • Hot spare policy still 1 per 30, cannot be adjusted
  • New REST API
  • CLI available (UEMCLI)
  • Unisphere Central can be used to monitor Unity as well as VNX systems
  • Still has FAST Cache and FAST VP functionality
    • FAST Cache can be shrunk and expanded online
    • No FAST Cache functionality on all flash Unity models
    • Similar structure to VNX2
      • Same configurable tiering options & schedules
      • 64KB block size for FAST Cache
      • 256 MB block size for FAST VP
  • Data-At-Rest Encyrption (D@RE) is available
    • Unique encryption key per drive
    • Must be configured at time of installation, cannot be disabled afterward
    • EMC estimates a 0% to 5% impact on performance when enabled
    • Currently only leverages internal keys


Data Replication, Migration & SnapShots

  • Unity uses redirect on write snapshots
    • Works on both file and block data
    • 256 snapshots per source
    • 3008 to 36020 snapshots per array (depending on model)
  • Built in replication functionality
    • Asynchronous replication for file and back
      • Snapshot based
      • One to many (or many to one) supported
    • Synchronous replication for block data only
      • One to one replication supported
      • Looks like this is only supported via Fibre Channel
    • No incremental attach
    • No bandwidth throttling
  • SAN Copy is supported with a Unity system as a target from a VNX or VNX2 array
  • Supports NDMP 3-way backups
    • 2/8/8/20 concurrent streams (scaling per Unity version I believe)


CloudIQ

  • Software-as-a-service cloud management dashboard
  • Dashboard widgets including general health, alerts, and pool predictive capacity
  • Aggregated listings such as alerts, systems, pools
  • Early access available, GA slated for late 2016


Unity Road-map (that which EMC is planning on adding to the product line)

  • Data in Place upgrades
  • Increased capacity on Unity 500 & Unity 600 systems (see above)
  • FIPS 140-2 Level 1 validation
  • ViPR Essentials (estimated July 2016)
  • External key management (for Data-At-Rest Encryption)
  • Integration with ProtectPoint


Additional Information

0 دیدگاه | سپتامبر 3, 2018

نحوه باز کردن دستگاه استوریج EMC VNXe3200

ارسال شده توسط admin | در دسته بندی Uncategorized

نحوه باز کردن دستگاه استوریج EMC VNXe3200

So, after a month of waiting – the big box from EMC finally arrived!

WP_20140819_001

For those not following me (@danevald) on twitter, I was fortunate enough to receive 1 of 10 VNXe3200 units that Chad Sakac of EMC put out for a Summer “Give-away” on his blog, to have in house for 8 months of testing and playing around with.

EMC VNXe3200 front

I’ve never played with a unit from EMC before, so I was pretty stoked to get this opportunity.

My company is currently searching for the future standard unit for our remote offices and factories. To be fair we don’t have high-performance demands for these sites, we are just searching for a simple to manage and great performing device for something between 5-15 VMware VMs, these could be DCs, application-servers and maybe a simple SQL server or the like. An important factor when we’ll select the future standard will of course be cost and checking out some of the standard bundles of VNXe3200 we weren’t scared, but at some point during the test, I’ll have to get a more exact price for this unit.

I will save the post-installation setup for a separate post, I saved a screenshot from every step – for me to remember what I did and also to display how easy it actually is to get the VNXe up and running and ready for play.

At first sight, the setup poster and documentation are created for ease of installation and should be OK for a remote helper get it set up into a rack and get it connected, so that a remote technician can set up the unit, when it’s connected.

Here are a few more pictures of the unit:
Back, with only 1 Storage Processor:
WP_20140804_14_49_08_Pro

Storage Processor Unit (1 of 2)
WP_20140804_14_48_45_Pro
WP_20140804_14_48_34_Pro

EMC Setup Poster:

WP_20140804_14_50_33_Pro

0 دیدگاه | آوریل 3, 2018

نصب و پیکربندی استوریج VNXe3200

ارسال شده توسط admin | در دسته بندی Uncategorized

نصب و پیکربندی استوریج VNXe3200

Part 2 in my series about my travels with the VNXe3200 from EMC, is what happened after I connected the 4x10Gbit(iSCSI/NFS) and 1Gbit(Management) connections.

I found the management IP in the DHCP, as it’s described on the setup-poster, punched it into a browser and put in the default username/password – ready, set – go!

image1

It recognizes that it’s the first start-up and kicks off the Unisphere Configuration Wizard:

First you accept the EULA:
image2

Change the default password to your own:
image3

Put in the license you received from EMC or your supplier:
image4

Yiha, it worked ?
img5

Put in DNS settings:
image6

Add a NTP server, required for Active Directory domain things, so the VNXe’s time doesn’t get skewed from the domain time:
image7

When I saw this warning, I was wondering why it appears in the initial setup. If it’s not able to apply the NTP settings without a reboot, that you’re not allowed to do during the initial setup, why not make it run the NTP setup after the configuration reboots the VNXe…
image8

Now the fun begins, Disk configuration:
image9

First, I configured the FAST Cache, the settings are pre-selected:
image10

A summary, that doesn’t let you change anything and doesn’t really provide anything you didn’t know…
image11

And FAST Cache is created:
image12

Successfully!:
image13
And now the FAST Cache is done, it’s time to do the Storage Pools:
image14

Decide for a fitting name and description:
image15

Here the fun begins, first create a Performance tier, which equals use of SAS disks
image16

image17
To save a spare disk, I used 5 out of 6 available SAS disks
image18
Tech guy says Yes! here – always! Though if for use with CIFS shares, probably would put it at No.
image19

Review details and click Finish – first Storage Pool is created.
image20

Working…
image21

And done…
image22

As the test unit VNXe has more Flash, I create another Storage Pool:
image23

Extreme Performance tier Storage Pool:
2014-08-20 21_46_08-

As I only have 3 drives and must keep 1 spare, this is the used config:
2014-08-20 21_46_25-OneDrive

Just another info slide, where nothing new is shown:
2014-08-20 21_46_50-OneDrive

And another…
2014-08-20 21_47_05-OneDrive

And it’s doing magic:
2014-08-20 21_47_14-OneDrive

And it’s done:
2014-08-20 21_47_32-OneDrive

Then you’re ready to proceed with the next step in the initial setup, EMC Support registration, here I put in my login for the EMC Support site, it gets accepted, but it fails when trying to set up the connection with EMC.
image24

Sure, sounds great (if it works)
image25

Setup SMTP for notifications and alerts:
image26

Now the connectivity setup begins, configuring the first connection pair:1
image27

Doing stuff:
image28

Setup the other interface pair, I only connected 2×2 10Gbit connections, so no more interfaces needs configuration for me:
image29

Now the NAS/NFS server setup:
image30

image31

Here you can only choose one, even though it looks as if both can be selected, should maybe be a drop down box:

image32

DNS Setup:
image33

Verify settings before creation:
image34

Aaaand done:

image35

NFS is ready:
image36

As the NTP service couldn’t be configured, the CIFS option is not availabe before after the first reboot and afterwards the NTP config.

So now it’s ready to finalize the configuration:
image37

After the reboot, a software update for Unisphere was available – as a good IT guy always make sure your stuff is updated ?
Select to Obtain the candidate online, and download the newest version from the EMC Support site:
img39

Then select the Upload and browse to the downloaded file and select Upload:
image40

When it’s done, you’ll see both version in the top part of the windows:
image42

Then select to Install Candidate Version and be aware:
image43

Starting:
image44

And working:
image45

image46

image47

image48

image49

image50

image51

image52

Then I tried to set up the EMC Secure Remote Support option:
image53

image54

image55

I haven’t tried the Live Chat to figure out what isn’t working, but might do that and update this post.


All in all, I’ve got to say, this is the most straight-forward set up I’ve tried on such a unit. “Luckily” almost everything worked, wonder if this crashes – it is web-based – would probably have to open up some SSH or IPMI… ?

0 دیدگاه | آوریل 3, 2018

Dell EMC Announces the Release of Isilon Generation 6 Platform and OneFS 8.1

ارسال شده توسط admin | در دسته بندی Uncategorized

Dell EMC Announces the Release of Isilon Generation 6 Platform and OneFS 8.1

Todd Jolley

Dell EMC Announces the Release of Isilon Generation 6 Platform and OneFS 8.1

We’ve just released our next generation hardware platform, featuring higher levels of performance, scale, and density. And, there’s a new, updated version of OneFS to go with it! Read on to learn more.


Generation 6 Platform

Isilon’s new Gen 6 platform, powered by Isilon OneFS 8.1, includes all-flash (F800), hybrid (H600, H500, H400), and archive storage (A2000, A200) systems that allow enterprise customers to take on more demanding unstructured data applications and gain new levels of performance.

(click for larger view of image)

Isilon F800

Isilon all-flash scale-out NAS storage system delivers extreme performance and density for your most demanding unstructured data applications and workloads.

Isilon H600, H500, H400

Isilon hybrid systems are designed to provide a balance of performance, capacity, and value to support a wide range of file workloads. Our hybrid systems are an ideal choice for your high performance computing (HPC) applications and workloads that don’t require the extreme performance of the Isilon all-flash solution.

Isilon A2000, A200

Isilon archive systems are designed for the increasing need of efficient data archiving solutions where you can store and protect data for long-term retention.


Isilon OneFS 8.1

OneFS 8.1 includes support for the Generation 6 platform as well as these new features:

Automatic Replacement Recognition (ARR)

When replacing a drive in your OneFS cluster, the new ARR feature automatically recognizes, formats, and adds that drive to the cluster.

(click for larger view of image)

CloudPools SmartLink Files

Your CloudPools SmartLink file version data is now stored and checked during NDMP Backup and NDMP Restore operations.

EMC Secure Remote Support (ESRS)

We added support for ESRS Gateway Server Release 3.x.

Licensing

Starting with OneFS 8.1, your Isilon software and hardware licensing is handled through the Dell EMC Software Licensing Central (SLC) system.

Smartpools

Smartpools features updates to L3 cache, node class, solid state drive, and quota settings.

OneFS Simulator

You can now install the OneFS Simulator using an OVA file.

CloudPools Documentation

Looking for the 411 on CloudPools content? Check out the OneFS CloudPools Administration Guide.

HDFS Documentation

The new OneFS with HDFS Reference Guide has everything you need to know about Isilon’s implementation of HDFS.

CLI Command Documentation

You can now find the CLI command content in the OneFS CLI Command Reference document.


More information

To learn more, check out the Isilon Generation 6 Platform Info Hub or OneFS 8.1 InfoHub. There you’ll find collections of related content, including release notes, guides, videos, and links to EMC Community Network (ECN) blog posts and discussions.

0 دیدگاه | ژانویه 13, 2018

Manage your data with the new EMC Isilon SDK

ارسال شده توسط admin | در دسته بندی Uncategorized

Manage your data with the new EMC Isilon SDK

The Isilon SDK is now available! The Isilon SDK includes documentation and code samples to help you to develop a customized interface to your Isilon OneFS cluster. The OneFS API is a REST-based HTTP interface that allows automation, orchestration, and provisioning of an Isilon cluster. Using the OneFS API, third-party applications can leverage the capabilities of the OneFS operating system to simplify management, data protection, and provisioning.

Code samples are available through the Isilon community on EMC {code} and from the Isilon GitHub repository. Immediately available for download is the Python Language Bindings for the OneFS API and the Statistics Browser tool.  The Isilon SDK Info Hub connects you to a central source of information and provides additional links to resources and documentation.

To use the Isilon SDK, you need either a physical Isilon cluster, or a OneFS simulator. See the video Technical Demo: EMC Isilon OneFS Simulator on the EMC YouTube channel to learn how to install the OneFS Simulator.

The Isilon SDK is Open Source and available free under the MIT license.

Sign up on the Slack EMC {Code} CodeCommunity and join the #isilon channel. Be part of the conversation about the Isilon SDK and receive news of future updates.

0 دیدگاه | ژانویه 13, 2018

تجهیزات ذخیره سازی خانواده EMC VNX

ارسال شده توسط admin | در دسته بندی Uncategorized

تجهیزات ذخیره سازی خانواده EMC VNX

تجهیزات ذخیره سازی خانواده EMC VNX

تجهیزات ذخیره سازی خانواده EMC VNX

تجهیزات ذخیره سازی خانواده EMC VNX

معرفی محصول:
تجهیزات ذخیره سازی خانواده EMC VNX: سازمان‌ها در هر اندازه نيازمند نگهداری و تأمين امنيت اطلاعات حياتی خود می‌باشند. هنگاميکه سازمانی با رشد اطلاعات روبه رو می‌شود، بودجه و فضای ذخيره سازی به همان سرعت افزايش نمی‌يابد. در نتيجه زيرساخت فناوری اطلاعات برای بکار گيری کارا و مؤثر از فضای ذخيره سازی دائماً تحت فشار بوده که بتواند با کمترين هزينه، رشد اطلاعات را مديريت نمايد.

شرکت EMC، محصولات سری VNX را با قابليت ارائه سرويس ذخيره سازی به صورت فايل و در سطح ديسک با ترکيب سخت‌افزار قدرتمند و نرم‌افزار مديريتی کارا به منظور رفع نيازهای سازمان‌های بزرگ و متوسط ارائه داده است.

EMC اولين شرکتی است که با ارائه راهکار فضای ذخيره سازی سلسله مراتبی شامل ديسک سخت و حافظه SSD و معرفی فناوری FAST VP و FAST Cache Multicore، امکان استفاده از فضای حجيم ذخيره سازی را با حفظ کارايی و کاهش زمان دسترسی ممکن ساخته است. پياده سازی فناوری‌های ياد شده موجب افزايش کارايی تا 3 برابر، افزايش سرعت انتقال اطلاعات تا 4 برابر، افزايش تراکنش های OLTP تا 4 برابر در Oracle و SQL، افزايش تعداد ماشين‌های مجازی قابل پشتيبانی تا 6 برابر و بهينه سازی مصرف پهنای باند تا 3 برابر می‌گردد. اين سری از محصولات امکان توسعه تا 2 پتا بايت و قابليت اتصال از طريق پورت‌های FC 8Gb/s، iSCSI 1/10Gbps و FCoE 10Gb/s را دارا می‌باشند.
تجهیزات ذخیره سازی خانواده EMC VNX
ويژگیهای کليدی

  1. معماری انعطاف پذير و کارا:
    • امکان ايجاد آرايه ترکيبی شامل ديسک سخت و حافظه Flash
    • امکان دسترسی به فضای ذخيره سازی با پروتکل های NFS و CIFS
    • پشتيبانی از پروتکل‌هاي iSCSI، Fiber Channel و FCoE
    • برخورداری از پردازشگر Intel Multi-Core Xeon E5- 2600 series
    • افزايش کارائی سيستم با توزيع پردازش‌های دستگاه ميان هسته‌های پردازشگر
  2. بهره وری و بهبود دسترسی به فضای ذخيره سازی:
    • افزايش سرعت بازخوانی اطلاعاتی که بيشتر مورد استفاده قرار می‌گيرند با استفاده از فناوری FAST Cache
    • کاهش زمان پاسخگويی با انتقال داده‌های پر مصرف به ديسک SSD با استفاده از فناوری FAST VP
    • انتقال اطلاعات کم مصرف به ديسک سخت سرعت پايين با افزايش قدمت داده‌ها با استفاده از فناوری FAST VP
    • قابليت حذف داده‌های تکراری با فناوری Deduplication و کاهش فضای ذخيره سازی اشغال شده تا 50%

تجهیزات ذخیره سازی خانواده EMC VNX

تجهیزات ذخیره سازی خانواده EMC VNX

  1. دسترس پذيری مداوم:
    • برخورداری از معماری افزونه در مسير انتقال اطلاعات، منابع تغذيه، اتصالات هارد ديسک و پردازشگرهای دستگاه
    • امکان نوشتن اطلاعات در حافظه موقت دو پردازشگر دستگاه به صورت آينه‌ای با امکان بازيابی در صورت خرابی پردازشگر
    • برخورداری از باطری پشتيبان در هر پردازشگر برای حفاظت از اطلاعات در زمان قطع برق
    • امکان تأمين دسترسی پايدار به فضای ذخيره سازی با استفاده از فناوری EMC VPLEX®
    • پشتيبانی از RAID های مختلف 0، 1، 1/0، 3، 5 و 6 در يک آرايه مشترک
    • امکان جايگزينی بدون اختلال کليه تجهيزا ت سخت افزاری دستگاه
  2. تأمين امنيت:
    • امکان رمزنگاری اطلاعات ذخيره شده برای تأمين امنيت اطلاعات در زمان جايگزينی يا حذف ديسک سخت
    • حفاظت از اطلاعات با تهيه نسخه پشتيبان محلی بصورت کامل و Snapshot با ايجاد نقطه بازگشت
    • حفاظت از اطلاعات با تهيه نسخه پشتيبان راه دور بصورت کامل و Snapshot با ايجاد نقطه بازگشت
    • تأمين حفاظت اطلاعات نرم افزار کاربردی در سری‌های VNX با استفاده از فناوری App Sync™
  3. مديريت و مانيتورينگ پيشرفته:
    • مديريت و پيکربندی آسان تجهيزات EMC VNX از هر مکان با استفاده از واسط کاربری جامع EMC Unisphere
    • امکان مانيتورينگ بی‌وقفه سيستم، ارسال اخطار از طريق ايميل و پروتکل SNMP
    • امکان تهيه گزارش از کارکرد سيستم، پيکربندی، بارکاری دستگاه و غيره بر اساس پيش طرح‌های تعبيه شده
    • امکان تغيير تنظيمات گزارش گيری توسط کاربر و صدور آنها به فرمت‌های مختلف
  4. سازگاری با محيط مجازی:
    • سازگار کامل با محيط های VMware با پشتيبانی از VAAI و VASA به منظور بهينه سازی کارکرد دستگاه
    • امکان يکپارچه سازی دستگاه EMC VNX در vCenter توسط رابط VMware vSphere™ plug-ins
    • پشتيبانی کامل از محيط‌های Server 2012 Hyper-V 3.0 و Citrix Xen Server
    • امکان تأمين فضای ذخيره سازی برای محيط‌های مبتنی بر Windows, VMware, Citrix با استفاده از ويزارد
    • مديريت رخداد با قابليت شناسايی اختلالات کارکردی دستگاه پيش از وقوع
  5. نرم افزارهای دستگاه فضای ذخيره سازی:
    • VNX Total Protection: شامل امکانات حفاظتی و نظارتی
      • Local Protection Suite: حفاظت داده‌ها بصورت محلی
      • Remote Protection Suite: حفاظت از داده‌ها با ارسال نسخه آينه‌ای بصورت راه دور
      • Application Protection Suite: خودکار سازی رونوشت برداری از نرم‌افزارها و بررسی صحت آنها
    • VNX Total Efficiency: شامل کليه امکانات حفاظتی، نظارتی و بهينه سازی کارايی سيستم شامل
      • FAST Suite: بهينه سازی دسترسی به اطلاعات با استفاده از حافظه SSD
      • Security and Compliance Suite: جلوگيری از پاک شدن و تغييرات مخرب بر روی اطلاعات
      • Local Protection Suite: حفاظت داده‌ها بصورت محلی
      • Remote Protection Suite: حفاظت از داده‌ها با ارسال نسخه آينه‌ای بصورت راه دور
      • Application Protection Suite: خودکار سازی رونوشت برداری از نرم‌افزارها و بررسی صحت آنها
      • Unisphere Management Suite: مديريت و مانيتورينگ چندين سيستم VNX
VNX Series Suites VNX Series Packs
FAST VNX Total Efficiency Pack
Security & Compliance
Local Protection VNX Total Protection Pack
Remote Protection
Application Protection


0 دیدگاه | نوامبر 26, 2017

Check Page Rank